Using the Crunchy PostgreSQL Operator with PostGIS
In today's blog post I am going to show you how to easily spin up PostGIS in your Kubernetes or OpenShift cluster using the PostgreSQL Operator. You may have already started to investigate how to take advantage of all the Kubernetes goodness, especially combining it with your favorite spatial database, PostGIS. Well have no fear, after a few introductory steps I will show you how one command can bring up PostGIS and then with another command, make it a replicated cluster. This replicated cluster will be able to handle automatic failover and backup tasks with ease. Let's get going!
Assumptions/Prerequisites
Before we get started I assume you already:
- Have a Kubernetes or OpenShift (remember OpenShift is Red Hat's distributions of Kubernetes) cluster up and running. It should be greater than Kubernetes 1.13 and OpenShift 3.11.
- You should also have the Crunchy Postgres Operator (hereafter referred to as PostgreSQL operator) installed in your Kube or OpenShift cluster and ready to deploy a PostGIS cluster.
- You have the
pgoclient utility on your local machine and set up to talk to your cluster. - You have read
the documentation
(for Windows, Mac, and Linux) or this blog post on
how to connect the
pgoclient to the PostgreSQL Operator on Windows. - Understand Kubernetes and OpenShift concepts, so if you see one here that you don’t understand you will know how to find more information.
- Know how to use PostGIS, especially importing data.
For this blog post we are going to use OpenShift because it has a nicer
interface and user experience for working with Kubernetes Objects. We installed
the
PostgreSQL Operator
in a namespace called pgo and we are going to put all our work in a namespace
named blog. We will create the blog namespace with the PostgreSQL Operator.
Provisioning Your Database
So let’s get started by provisioning our database. The first step is going to be
getting pgo client tool, used to interact with the PostgreSQL Operator,
talking to the API container in the operator pod.
Since we are using OpenShift we are going to use the oc command line tool to
get our pgo connection working. The kubectl command have the exact same
syntax.
Make sure your oc client is authenticated to your cluster and then away we go:
$ oc project pgo
    Now using project "pgo" on server "https://openshift-pousty-ocp.gce-containers.crunchydata.com:443".
$ oc port-forward svc/postgres-operator 8443:8443
    Forwarding from 127.0.0.1:8443 -> 8443
    Forwarding from [::1]:8443 -> 8443
We told the OpenShift client to:
- Use the namespace
pgo, where we had installed the PostgreSQL Operator. - Port-forward port 8443 on our local machine to port 8443 of the Kubernetes
service fronting the operator. This will allow us to send
pgocommands from our local machine.
Now let's make our PostGIS database cluster!
$ pgo create namespace blog
$ export PGO_NAMESPACE=blog
$ oc project blog
# In windows command shell you would do:
#    set PGO_NAMESPACE="blog"
# In windows powershell
#    $env:PGO_NAMESPACE="blog"
$ pgo create cluster spatialcluster --ccp-image=crunchy-postgres-gis-ha
Congratulations - with one line you have just spun up a PostGIS cluster inside your Kubernetes cluster. It is using PVCs for data storage, has the PostGIS extension already enabled, and you can use the PostgreSQL Operator to manage all types of administrative tasks.
Here is what the actual commands accomplished:
- Create a new namespace/project in our OpenShift instance. If the namespace already exists the command will tell you so and not doing anything else.
- Told the PGO command line to do everything in that new namespace. We did not
have to do this (you can always add a
-n blogonto anypgocommand). - Tell the
occommand line that all it's command apply to theblognamespace. - Created a nice PostGIS cluster with a database named
demodb.
Finding the usernames and passwords
You might be wondering "How do I find the username and password to connect to my database?" Well when we created the PostgreSQL cluster using the PostgreSQL Operator, it created some Secrets.
To see all the secrets made by the operator, in the OpenShift Web UI:
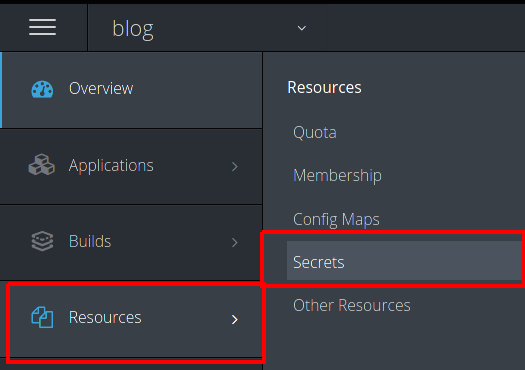
Once you click on secrets you will see all the secrets in the namespace/project.
The ones we are interested in all begin with the name we use for our PostgreSQL
cluster (which in our case is 'spatialcluster') The two we really care about are
the ones with postgres and dev in the name:
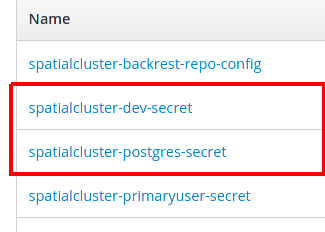
These correspond to the postgres (superuser) user and the normal unprivileged
user (named dev).
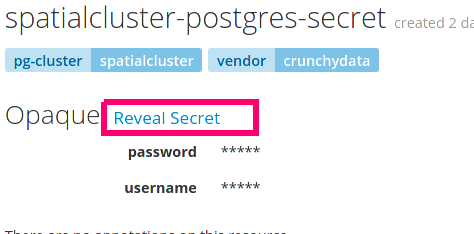
To actually see the password that correspond to that user go ahead and click on the secret. And then click on the 'reveal secret' link to see the unencoded password.
Using the Command Line
If you don't like using a GUI or are using Kubernetes you can still get this
information using command line utilities. The usernames are going to be part of
the Kubernetes secret created by the PostgreSQL Operator in the secret itself.
The passwords are also in the same secret and both the username and password are
Base64 encrypted. Let's first find all the secrets created by the operator -
their names will start with the name of the database we spun up
(spatialcluster).
$ oc get secret -l pg-cluster=spatialcluster
NAME                                  TYPE      DATA      AGE
spatialcluster-backrest-repo-config   Opaque    7         19d
spatialcluster-dev-secret             Opaque    2         19d
spatialcluster-postgres-secret        Opaque    2         19d
spatialcluster-primaryuser-secret     Opaque    2         19d
The two secrets we care about are the PostgreSQL secret and the dev secret. The
PostgreSQL secret is the username and password for the PostgreSQL user. The dev
secret is for the PostgreSQL account for a normal user with the username dev. So
oun two usernames are postgres and dev.
To get the pass we have to ask for the specific element in the secret and then decrypt it. On Linux and Mac the command is:
$ oc get secrets/spatialcluster-postgres-secret --template='{{.data.password}}' | base64 -d
rEaddZCcfy
On Windows it's not quite so simple since there doesn't seem to be a analog to base64 that ships with Windows 10. On my Windows machine, base64 was actually installed with the Git for Windows install. There are other places to get base64 for windows as well but I can not speak to their safety for validity. It might also be that, if it's installed on your machine, OpenSSL might be able to do it.
Now, we have all we need to connect to our database and loading some data.
Importing data from the local machine
Now we can use all the normal methods to load spatial data into our database. There are two ways to achieve this and it depends on how we receive our data. The first method will be the most general and will assume you have all the import tools you need on your local machine. The other method will transfer the data up to a directory in the pod running in the Kube cluster and then do the import all in the pod.
I am going to load some data from the Crunchy Demo Data repository. To be more precise, I downloaded the latest release and loaded the county boundaries and storm data. You will see in the release notes for the data above that we are using the psql command line.
Once I have downloaded the data to my machine I am ready to connect to my PostgreSQL cluster.
The first step is to port-forward again, so that port 5432 on our local machine is actually talking to 5432 on the pod running our database in kubernetes.
oc port-forward svc/postgres-operator 5432:5432
And with that we are set to go. Now we can use the psql commands to import the
data we downloaded. Please execute the command in the same directory where you
downloaded the data. We are going to use the postgres user to import the data
and execute the command where we downloaded the data:
gunzip -c crunchy-demo-data.dump.sql.gz |psql -h localhost -U postgres -p 5432 workshop
When prompted for the password, use the password we got for the postgres user
above.
If you had
shp2pgsql
on your local machine you could do:
shp2pgsql -s 4326 neighborhoods public.neighborhoods | psql -h localhost -d workshop -U postgres
Where neighborhoods is the name of your shapefile and you want to create the neighborhoods table in the public schema and the data will be in EPSG 4326.
If you had QGIS or any other desktop database tool, once you set up the port-forward, you could use the connection information used in the psql commands above to fill in the connection information for the PostGIS connection.
Importing Data on the pod
All of these methods for importing or working with the data are going to,
depending on the size of your data, carry them out with a lot of back and forth
transactions between your machine and the servers. Sometimes, if there is a lot
of data to move into your database it can be faster to compress the data, move
it as one file onto the db server, and then run the import directly on the
server. unzip, tar, and psql are all in the container that Crunchy Data
ships so we can use them directly in the pod. I will give you the two commands
needed before the psql command since the psql connection parameters don't
change from the ones above.
To get the file from you local machine you can use the OpenShift command
oc rsync which is an enhanced version or kubectl cp (OpenShift also has the
oc cp command as well). Today we will just use the simple cp command to move
a file.
We need to get the name of the pod and then we can copy the file up:
# We need to find the pod of the primary postgres instance, which is typically the cluster
# name followed by to random sequences
> oc get pods
NAME                                                   READY     STATUS      RESTARTS   AGE
backrest-backup-spatialcluster-w7lhb                   0/1       Error       0          15d
spatialcluster-5687d8988c-kppx9                        1/1       Running     2          21d
spatialcluster-backrest-shared-repo-7766844649-9qvkb   1/1       Running     2          21d
spatialcluster-stanza-create-s6c64                     0/1       Completed   0          21d


>  oc cp .\sql.dump  spatialcluster-5687d8988c-kppx9:/tmp
We have now moved our dump file into the /tmp in the pod. This file will be
erased if the pod is restarted or moved to another node, but the chances of that
happening before we actually carry out our restore are slim. Now it's time to
get a shell prompt in our pod and do the restore.
>  oc exec spatialcluster-5687d8988c-kppx9 -it bash
bash-4.2$
bash-4.2$ cd /tmp
bash-4.2$ psql -h localhost -U postgres workshop -f dump.sql
...
To get out of the bash prompt you can do CTRL-d or type exit
Wrap up
And with that we have:
- Created a PostGIS instance in Kubernetes.
- Populated the database with data.
- Have the ability to use all the other Operator commands to manage our database.
- Have the ability to connect to the database from our local machine to use our favorite desktop tools.
If we wanted to make our database into a replicated cluster the command is quite simple. There is an important caveat if you plan to bulk load data into your database. For large data sets, the preferred pattern is to add replicas after importing the data. This is preferred is because importing the data creates large Write Ahead Log (WAL) entry files that will have to be retained until the replicas catch up. If you have not allocated quite a bit more disk space it can easily exhaust your disks and lock up PostgreSQL.
With that warning it's time for you to head off and have fun building apps and answering questions with your new PostGIS database.
